
2010 Odyssey - Timing Belt Change - Baffled - Please help


Thread Starter
|
Junior Member
Joined: Mar 2024
Posts: 3
Have used this site many times for my wife's pilot. Hope you can help with a 2010 odyssey I gave to my son. 3.5 engine. 97,000 miles. Doing a timing belt change on the Odyssey. Was running perfectly when I tore it down. Just preventative maintenance before he goes off to college in May. No problem getting it apart. Rotated cams and crank to TDC before removing belt, water pump, idler pulley etc. While installing the new Timing belt and ensuring I got the TDC marks lined up the rear bank camshaft jumped (felt like cam coming off a lobe ramp). It happened so quick I believe it only moved ~45 degrees ccw. Drivers has never moved (I believe).
Rotated rear most cam back into proper alignment. Ensured the alignment marks are set so all three (2 cams and crank) to TDC). Pulled all 6 plugs to make it easy to rotate. Once I was sure everything was aligned, I went to rotate the engine two revolutions. Before I got to ~25-35 degree of CW rotation at the camshafts it felt like I was hitting something hard/metal to metal and like it would not rotate further and I don't want to cause damage or force it. Bad things happen on a zero-clearance engine as I am sure you know.
Ps. Just read something that I found interesting. On one site a person mentioned that when he was set crank to TDC - The front cam points to #5, He had to rotate the crank ccw and bring the front cam around again and this time the cam lined up with #1 on the camshaft pulley. Could I have a crank that is 360 degrees out of sink or a cam that is same? How to remedy?
Disassembled engine again and made sure the crank rotates smoothly and it does. Took it through ~220 degree arc backwards and forward with no belt attached before I felt any contact. Took a borescope and checked each cylinder. All are clean with no witness marks on the top of the pistons. Cylinder wall cross hatches look great. #1 is at TDC, #4 looks like its 2/3 down the bore, #5 nearing TDC. The other three are fairly far down their bores with a combination of close and open valves. Can see the valves clearly. Again, no marks. So what the heck is causing the hard stop? Is it possible that either cam jumped a full 180 degrees? Why would it matter if crank turns once for every two cam turns? and everything is at TDC? Need someone with more smarts/experience than me at this point. I am baffled. Please help :> Son, Wife, Dad would be very thankful!
Ps. Just read something that I found interesting. On one site a person mentioned that when he was set crank to TDC - The front cam points to #5, He had to rotate the crank ccw and bring the front cam around again and this time the cam lined up with #1 on the camshaft pulley. Could I have a crank that is 360 degrees out of sink or a cam that is same? How to remedy?
Rotated rear most cam back into proper alignment. Ensured the alignment marks are set so all three (2 cams and crank) to TDC). Pulled all 6 plugs to make it easy to rotate. Once I was sure everything was aligned, I went to rotate the engine two revolutions. Before I got to ~25-35 degree of CW rotation at the camshafts it felt like I was hitting something hard/metal to metal and like it would not rotate further and I don't want to cause damage or force it. Bad things happen on a zero-clearance engine as I am sure you know.
Ps. Just read something that I found interesting. On one site a person mentioned that when he was set crank to TDC - The front cam points to #5, He had to rotate the crank ccw and bring the front cam around again and this time the cam lined up with #1 on the camshaft pulley. Could I have a crank that is 360 degrees out of sink or a cam that is same? How to remedy?
Disassembled engine again and made sure the crank rotates smoothly and it does. Took it through ~220 degree arc backwards and forward with no belt attached before I felt any contact. Took a borescope and checked each cylinder. All are clean with no witness marks on the top of the pistons. Cylinder wall cross hatches look great. #1 is at TDC, #4 looks like its 2/3 down the bore, #5 nearing TDC. The other three are fairly far down their bores with a combination of close and open valves. Can see the valves clearly. Again, no marks. So what the heck is causing the hard stop? Is it possible that either cam jumped a full 180 degrees? Why would it matter if crank turns once for every two cam turns? and everything is at TDC? Need someone with more smarts/experience than me at this point. I am baffled. Please help :>
Son, Wife, Dad would be very thankful!Ps. Just read something that I found interesting. On one site a person mentioned that when he was set crank to TDC - The front cam points to #5, He had to rotate the crank ccw and bring the front cam around again and this time the cam lined up with #1 on the camshaft pulley. Could I have a crank that is 360 degrees out of sink or a cam that is same? How to remedy?
Last edited by 2013 Pilot #55; Mar 2, 2024 at 03:23 PM. Reason: found another interesting idea on what it may be


Senior Member
Joined: Feb 2022
Posts: 1,685
Operation CHARM: Car repair manuals for everyone.
Home >> Honda Truck >> 2010 >> Odyssey V6-3.5L >> Repair and Diagnosis >> Maintenance >> Timing Belt >> Service and Repair >> Timing Belt Replacement (J35A6)
Timing Belt Replacement
NOTE: The following procedure is for installing a new timing belt. If you are installing a used belt, refer to the timing belt installation procedure Timing Belt Installation (J35A6).
1. Remove the timing belt Timing Belt Removal (J35A6).
2. Clean the timing belt pulleys, the timing belt guide plate, and the upper and lower covers.
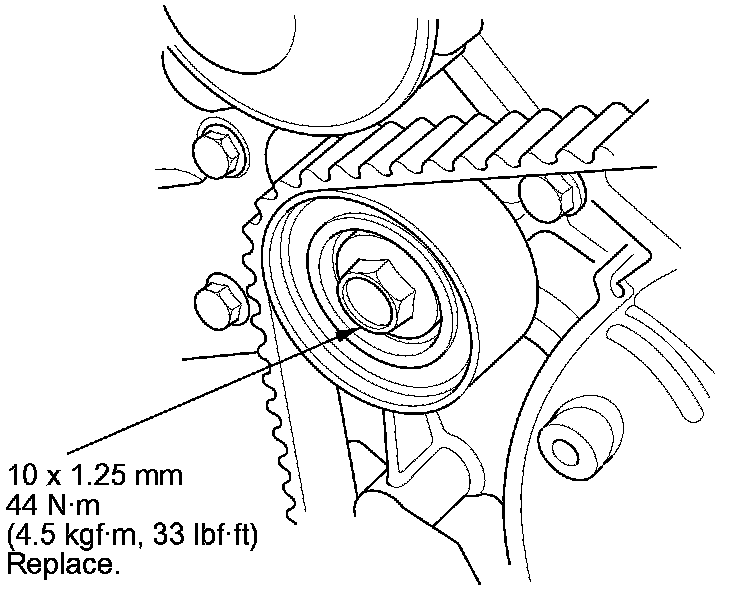
3. Set the timing belt drive pulley to top dead center (TDC) by aligning the TDC mark (A) on the tooth of the timing belt drive pulley with the pointer (B) on the oil pump.

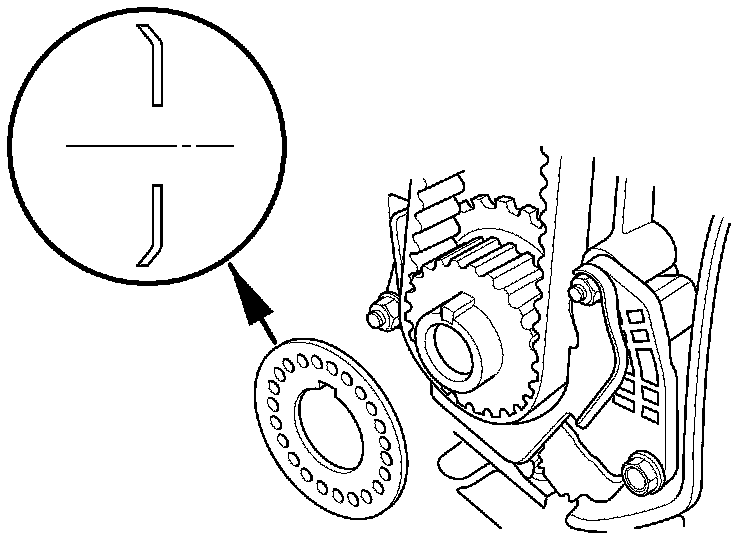
4. Set the camshaft pulleys to TDC by aligning the TDC marks (A) on the camshaft pulleys with the pointers (B) on the back covers.
FRONT

REAR

5. Remove the battery clamp bolt from the back cover.
6. Remove the auto-tensioner.

7. Align the holes on the rod and the housing of the auto-tensioner.

8. Use a hydraulic press to slowly compress the auto-tensioner. Insert a 2.0 mm (0.08 in) pin through the housing and the rod.
NOTE: The compression pressure should not exceed 9,800 N (1,000 kgf, 2,200 lbf).
9. Install the auto-tensioner.
NOTE: Make sure the pin stays in place.

10. Thread the battery clamp bolt in as shown to hold the timing belt adjuster. Tighten it by hand, do not use a wrench.

11. Loosely install the idler pulley with a new idler pulley bolt so the pulley can move but does not come off.
12. Install the timing belt in a counterclockwise sequence starting with the drive pulley.
1. Drive pulley (A)
2. Idler pulley (B)
3. Front camshaft pulley (C)
4. Water pump pulley (D)
5. Rear camshaft pulley (E)
6. Adjusting pulley (F)

13. Tighten the idler pulley bolt.
14. Remove the pin from the auto-tensioner.

15. Remove the battery clamp bolt from the back cover.
16. Install the lower half of the side engine mount bracket.

17. Install the timing belt guide plate as shown.
18. Install the lower cover.

19. Install the front upper cover (A) and the rear upper cover (B).

20. Install the crankshaft pulley Crankshaft Pulley Removal and Installation (J35A6).
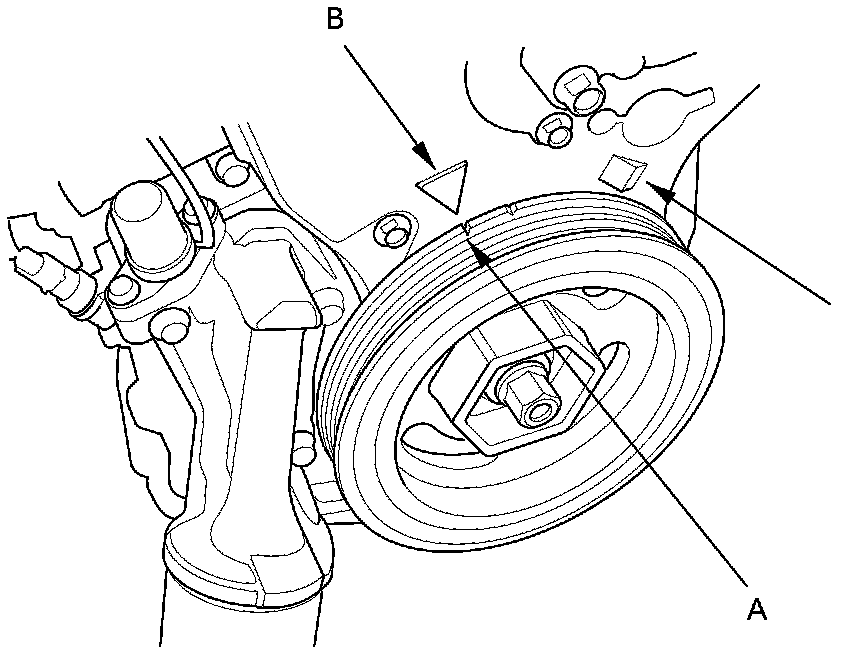
21. Rotate the crankshaft pulley six turns clockwise so the timing belt positions itself on the pulleys.
22. Turn the crankshaft pulley so its white mark (A) lines up with the pointer (B).
NOTE: The other pointer (C) is not used.
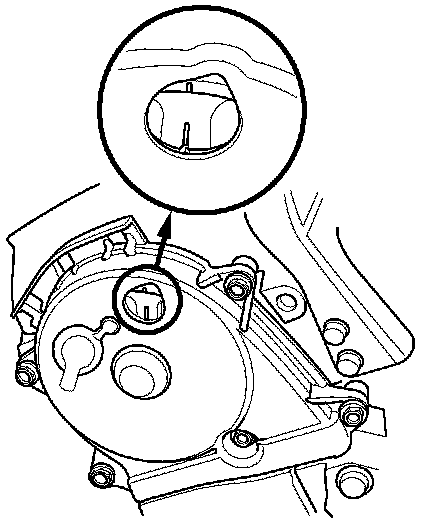
23. Check the camshaft pulley marks.
NOTE: If the marks are not aligned, rotate the crankshaft 360 degrees, and recheck the camshaft pulley mark.
- If the camshaft pulley marks are at TDC, go to step 24.
- If the camshaft pulley marks are not at TDC, remove the timing belt and repeat steps 3 through 23.
FRONT

REAR
24. Install the upper half of the side engine mount bracket, then tighten the mounting bolts in the numbered sequence shown.

25. Install the drive belt auto-tensioner Drive Belt Auto-Tensioner Replacement (J35A6).
26. Install the splash shield.

27. Install the right front wheel.
28. Do the crankshaft position (CKP) pattern clear/CKP pattern learn procedure Initial Inspection and Diagnostic Overview.
pro multis � About Operation CHARM
Home >> Honda Truck >> 2010 >> Odyssey V6-3.5L >> Repair and Diagnosis >> Maintenance >> Timing Belt >> Service and Repair >> Timing Belt Replacement (J35A6)
Timing Belt Replacement (J35A6)
Timing Belt Replacement
NOTE: The following procedure is for installing a new timing belt. If you are installing a used belt, refer to the timing belt installation procedure Timing Belt Installation (J35A6).
1. Remove the timing belt Timing Belt Removal (J35A6).
2. Clean the timing belt pulleys, the timing belt guide plate, and the upper and lower covers.
3. Set the timing belt drive pulley to top dead center (TDC) by aligning the TDC mark (A) on the tooth of the timing belt drive pulley with the pointer (B) on the oil pump.
4. Set the camshaft pulleys to TDC by aligning the TDC marks (A) on the camshaft pulleys with the pointers (B) on the back covers.
FRONT
REAR
5. Remove the battery clamp bolt from the back cover.
6. Remove the auto-tensioner.
7. Align the holes on the rod and the housing of the auto-tensioner.
8. Use a hydraulic press to slowly compress the auto-tensioner. Insert a 2.0 mm (0.08 in) pin through the housing and the rod.
NOTE: The compression pressure should not exceed 9,800 N (1,000 kgf, 2,200 lbf).
9. Install the auto-tensioner.
NOTE: Make sure the pin stays in place.
10. Thread the battery clamp bolt in as shown to hold the timing belt adjuster. Tighten it by hand, do not use a wrench.
11. Loosely install the idler pulley with a new idler pulley bolt so the pulley can move but does not come off.
12. Install the timing belt in a counterclockwise sequence starting with the drive pulley.
1. Drive pulley (A)
2. Idler pulley (B)
3. Front camshaft pulley (C)
4. Water pump pulley (D)
5. Rear camshaft pulley (E)
6. Adjusting pulley (F)
13. Tighten the idler pulley bolt.
14. Remove the pin from the auto-tensioner.
15. Remove the battery clamp bolt from the back cover.
16. Install the lower half of the side engine mount bracket.
17. Install the timing belt guide plate as shown.
18. Install the lower cover.
19. Install the front upper cover (A) and the rear upper cover (B).
20. Install the crankshaft pulley Crankshaft Pulley Removal and Installation (J35A6).
21. Rotate the crankshaft pulley six turns clockwise so the timing belt positions itself on the pulleys.
22. Turn the crankshaft pulley so its white mark (A) lines up with the pointer (B).
NOTE: The other pointer (C) is not used.
23. Check the camshaft pulley marks.
NOTE: If the marks are not aligned, rotate the crankshaft 360 degrees, and recheck the camshaft pulley mark.
- If the camshaft pulley marks are at TDC, go to step 24.
- If the camshaft pulley marks are not at TDC, remove the timing belt and repeat steps 3 through 23.
FRONT
REAR
24. Install the upper half of the side engine mount bracket, then tighten the mounting bolts in the numbered sequence shown.
25. Install the drive belt auto-tensioner Drive Belt Auto-Tensioner Replacement (J35A6).
26. Install the splash shield.
27. Install the right front wheel.
28. Do the crankshaft position (CKP) pattern clear/CKP pattern learn procedure Initial Inspection and Diagnostic Overview.
pro multis � About Operation CHARM
Last edited by grcauto; Mar 2, 2024 at 07:27 PM.

Thread
Thread Starter
Forum
Replies
Last Post
forevermemorable
General Tech Help
0
Oct 5, 2020 08:38 PM
96accord96
Honda Accord Forum
8
Nov 9, 2019 10:07 PM
forevermemorable
Honda Civic Forum
4
Sep 20, 2013 11:36 AM